How to Put a Project Under SVN Control
Developers use SVN to maintain current and historical versions of files such as source code, web pages, and documentation. In this article, I’ll be doing a walkthrough of how to put a PHP project into source control using Subversion also known as SVN. I will be using the command line on an Ubuntu server to create a new repository, and TortoiseSVN to checkout and commit files into SVN.
Make sure that the following prerequisites have been completed:
- SVN server has been installed on your server.
- Tortoise SVN client has been installed on your workstation.
- Putty has been installed on your workstation.
In Windows Explorer, determine where you would like to keep your source code. I like to keep my sources under the C:\wamp\www\ folder. In this exercise, our project folder will be named stored in C:\wamp\www\ciproj1\.
Open a new Putty session and connect to your SVN server. Find out where your repository folder is. In this example, our repositories are stored in the \home\svn\repos\ folder. The new repository name will be ‘ciproj1’. Make sure that your user has super user access to run the SVN commands below:
    cd /home/svn/repos
    sudo svnadmin create ciproj1
    sudo chown -R www-data.www-data ciproj1
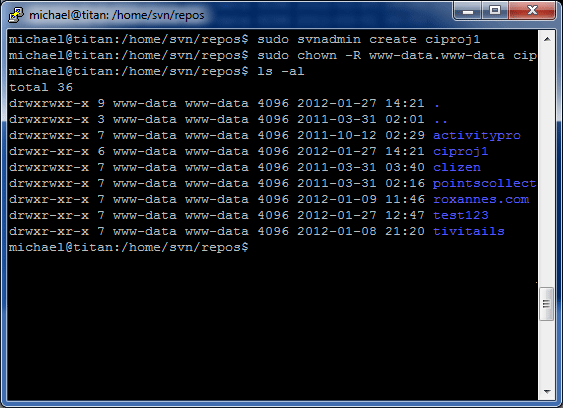
Putty SVN svnadmin create command
The last command gives Apache read and write access to the new repository.
Review the access control file to make sure users can use the new repository. In this example, our access control file is located in the /etc/ folder.
vi /etc/svn-access-control
Now we should be able to checkout the new repository using TortoiseSVN’s checkout command. First, rename the C:\wamp\www\ciproj1 folder to C:\wamp\www\ciproj1-bak. This is because when we checkout the new repository, we don’t want to overwrite your existing folder.
In Windows Explorer, right-click on an empty space, and choose SVN Checkout. In the URL of repository field, enter the URL to your SVN server, making sure that the last directory points to your newly created repository. Click OK.
Notice that the new folder will have a green checkmark, indicating that it is under source control. The repository is currently empty. The Subversion documentation recommends that you create 3 subfolders under the root of your project as follows:
C:\wamp\www\ciproj1\branches
C:\wamp\www\ciproj1\tags
C:\wamp\www\ciproj1\trunk
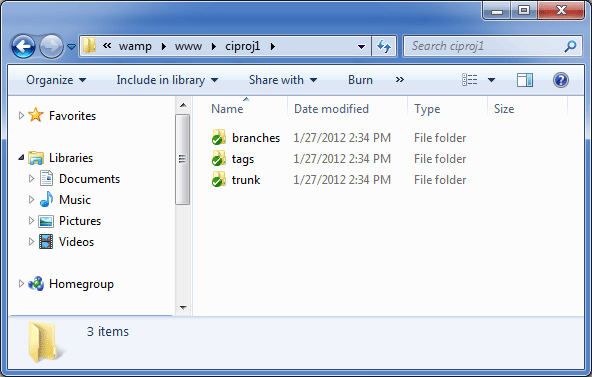
SVN Folders from the root as recommended by Subversion documentation
Your files should be placed into the trunk directory. The trunk folder is where the code is unstable because it is being developed by 1 or more developers. I will not go into details of what the branches and tags folder are for.
Copy and paste the files and folders located in C:\wamp\www\ciproj1-bak\ folder into the trunk folder.
From the C:\wamp\www\ciproj1\ folder, right-click on an empty space, and navigate to TortoiseSVN > Add. Acknowlege the following screen by clicking OK. Be default, all files will be Added to source control.
The final step is to run the commit command: right-click on an empty space, click SVN Commit. Enter a comment, for example, “This is the first commit.” and click the OK button.
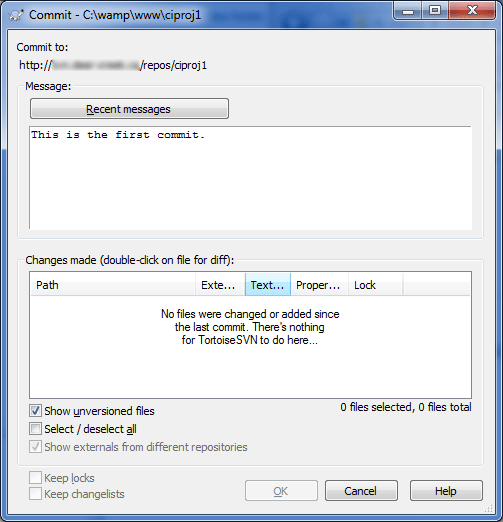
SVN Commit
I just want to make a note that there are other ways to import a project into SVN, and this is just one of them. I hope you enjoyed that walkthrough. Let me know if you have any comments.
Below are links where you can download the applications used in this tutorial:
- Subversion: http://subversion.tigris.org/
- TortoiseSVN: http://tortoisesvn.tigris.org/
- Putty: http://www.chiark.greenend.org.uk/~sgtatham/putty/
